Driven Productions Torsion Chassis
for the Losi Micro Rock Crawler
(No Shock Chassis)
Problems with the stock chassis and shocks?
One of the biggest problems with the Losi Micro Rock Crawler has been the shocks and springs. In stock form the truck sits too high and the springs are too stiff. Many have tried various methods to fix this problem.....but hand it to DP to come up with a solution that not only fixes the problem but ELIMINATES it completely!
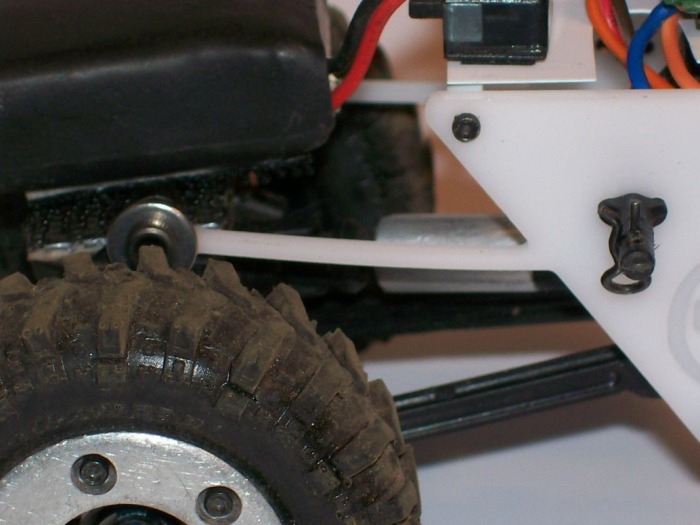
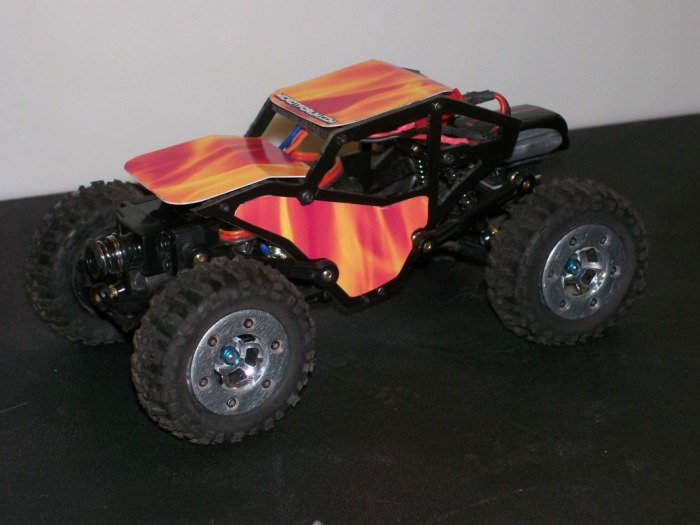
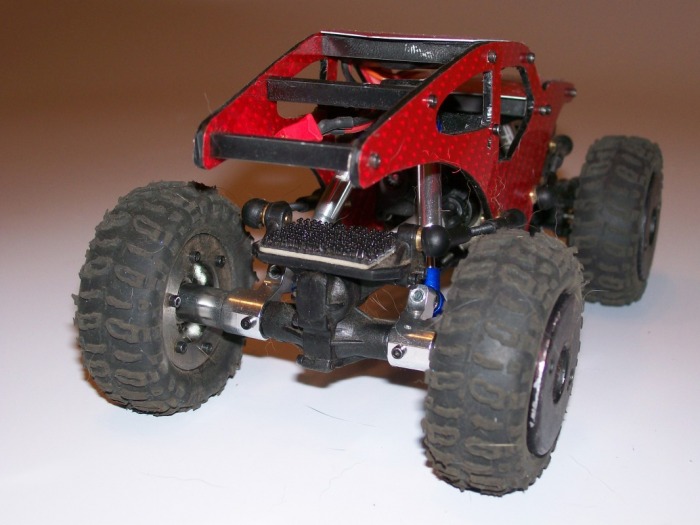
Now this is the most unusual chassis for the micro crawler...it doesn't look like anything else out there. Perhaps the most outstanding feature of the chassis is the torsion bars extending from the chassis plate. These, as you will see in a little bit, will totally eliminate the need for shocks and springs on your crawler.
I know you are pretty skeptical at this point but hang in there and you will be very surprised at the finished product and the performance!
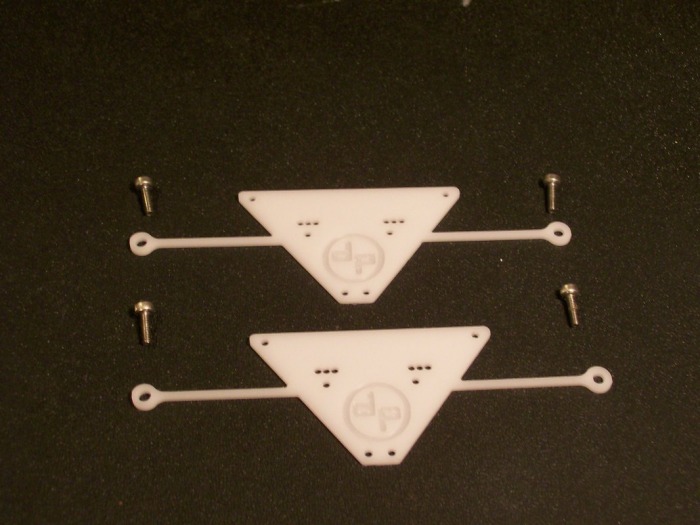
The kit comes with everything you need, two Delrin chassis plates and four screws to attach the torsion arms to the front and rear mounts.....simple.
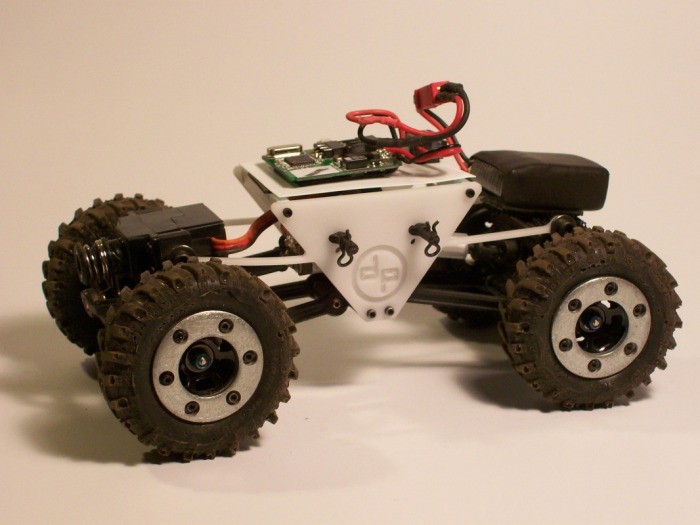
This chassis/conversion kit is designed for use with the stock crawler and uses all the stock parts minus the shocks, springs, and upper arms.
Its designed to use the stock plastic mount for the battery, receiver and use the stock body.
You two lengths of 2.5 bolts, the shorter one lets you snug the bolts down with out pushing into the servo (less suspension articulation).
The longer bolts are so you can leave the bolts 1/8th of an inch from being tighten down all the way. What that does is gives the chassis more articulation since the arms can slide back and forth over the bolt with it backed off from sitting flush.
The chassis is designed to mount with the DP logo facing outward on both side plates.
(good for advertising but also necessary for the holes to align up correctly)
When bolting the chassis down get all the bolts started then tighten them down evenly.
That being said and done I dove right in and had the crawler converted in about 15 minutes....very easy. However for my review I did make a couple of changes simply because of the way I prefer to run things.
Change #1 I run my battery on the rear deck.....so no stock battery holder used.
Change #2 I run a de-cased ESC so no case or stock ESC tray used.
I did cut two cross braces to replace the stock parts, drilled and taped them and installed, the ESC is servo taped in place on a small styrene plate on top of the braces....these changes do not change the way the kit performs in any way except to change the weight bias and lowers the COG of the crawler.
But does it work!?!?
The articulation is adjustable (as stated above), I set this one to the loose setting (more articulation) and it is better than the stock suspension set up with stock shocks and springs. The action is smoother and the DP chassis does articulate farther than stock chassis
The first thing you notice is that the DP Torsion chassis sits lower than the stock chassis and this lowers the COG (center of gravity). This allows the truck to tackle steeper hills and more radical obstacles with reduced roll overs. The new chassis reacts to the terrain in a very predictable fashion, however it is different from a chassis with shocks and springs (see my notes at the end for handling tips).
I did two battery packs through this new chassis tonight on my Abusement Park Course....one 7.4v pack and one 3.7v pack, to compare the differences in the performance at the different voltages.
7.4v 2S Lipo pack performance was very good, the DP Torsion Chassis really surprised me with it's ability to handle the track (my track is known for it's steep climbs, narrow ledges, off-camber rock passes, and other difficult obstacles) The new chassis made the complete circuit....this is no easy feat and is something a stock crawler has not been able to complete.
3.7v 1S Lipo pack performance is even better, slow this baby down and let the chassis do the work! This thing is even better at low speeds where the chassis has more time to react to the terrain.
I am very impressed, and if a great looking chassis that works isn't enough then add the fact that this chassis is the CHEAPEST aftermarket Hop-Up chassis on the market at a suggested retail of only $15.00!!!!
This is a great way for a guy to step up from the stock chassis/suspension to a new level of performance at an affordable price.
The Dog has to give this Two Thumbs Up
NOTES:
Lower the COG as much as possible, de-case the ESC, move the battery to the rear deck.
Add wheel weights, I have found a front weight of 38-50g and a rear weight of 25-35g works wonders for making the suspension work better and smoother and adds tons of traction.
Store you truck on a stand so that the arms are flexed down, continuous weight on the arms may cause the to permanently bow upwards.
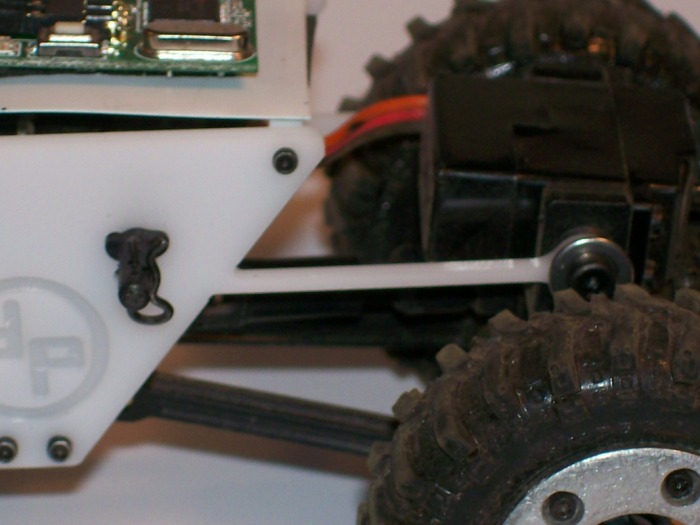
The Torsion bars replace the upper arms, since the torsion bars are farther inboard there is no more tire rub at full turn!

Hot Racing Air Shocks for Losi Micro Rock Crawler
So with the release of the Internal Spring HR Air Shocks....it's time for the DOG to do his thing and thrash test the hell out of them....and give you guys the inside scoop.
Everyone has wanted a better shock since the Micro Crawler was released. Lets face it the stockers are very flimsy and have extremely weak threads at the bottom end....many have broken them....so are the HRs any better?
Will they hold up? And are they worth the hefty price tag of $28?
I ordered them up....shipping was fast enough and they came with an extra set of stiff springs (silver) and soft springs installed (black).
They mount on a floating ball set-up and came with all the screws, balls, and o-rings to install (but no 1.5mm hex wrench included)
The shafts are 2mm....quite a bit thicker than the stock shafts, so I don't see shaft breakage being an issue with these. Alloy tops and bottoms are also a nice touch (even though they are only available in blue/silver right now, would like to have had black or gun metal)
The alloy bodies have a pressed nylon bushing in the bottom, makes them feel very smooth, almost like an oil shock....the action is quite nice......until you install them. Even with the soft springs they are waaaaay to stiff to be useful!!! They absolutely will not droop or compress under the slight weight of the Micro Crawler.......totally disappointed.
However all is not lost.....after two hours of messing with them I did get them to work, but unless you are willing to spend the time and effort to get them to work then stop right now and run the other way.
So what I had to do was disassemble all four shocks, remove the shafts.
Then heated a 2mm steel rod till hot and inserted it into the nylon bushing, this relieved the pressure on the shock shaft. (when they pressed the shock bottoms to hold the bushing in it compressed the bushing too, making it grip the shaft a bit too much)
Now with the pressure on the shaft relieved I added a drop of oil and worked them in and out till smooth. At this point you can reassemble them....or if you like a bit of droop like I do then read on.
The supplied springs make these shocks the same length as the stock shocks.....I like droop in mine, not full, but about 2/3 droop. I took the soft black springs and cut them in half and installed 1/2 in each shock, this gave each shock about 1/4 inch of spring play under weight.....just where I wanted them.
At this point I put them back on the truck, charged a battery and went for a crawl.....
These do work, and they look great.
Do they work any better than the stock shocks?.....not that I could see, they both have the same length, and I think the stockers react faster than the HRs
Do they look better than the stockers?....Hell Ya!
Are they as weak as the stockers?....No, with a 2mm shaft it is a big improvement
Are they worth the $28 price tag?...In my opinion, no, they took a lot of work to get them right, they are alloy but I don't need bling I need a shock that works!
Some guys are going to like the internal springs, and they might look great on a scaler.....but don't blow your money expecting these to bolt right on and work...
DOG's rating....
One thumb up (2mm shaft, good looks)
One thumb down (high price, springs to stiff, sticky bushings, a lot of work to make them work)

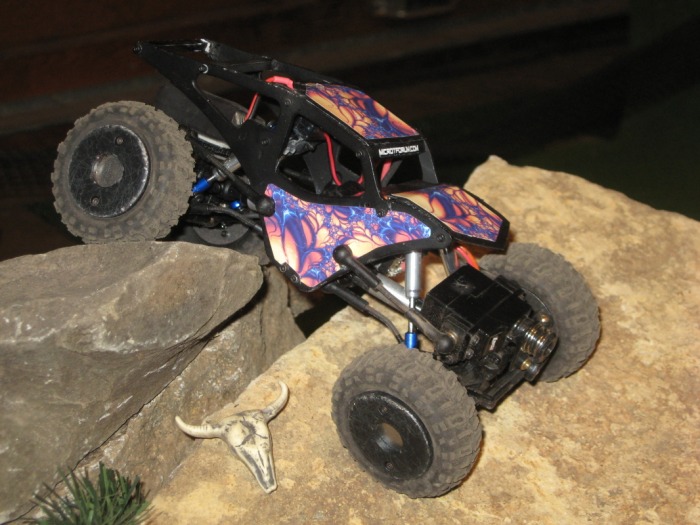
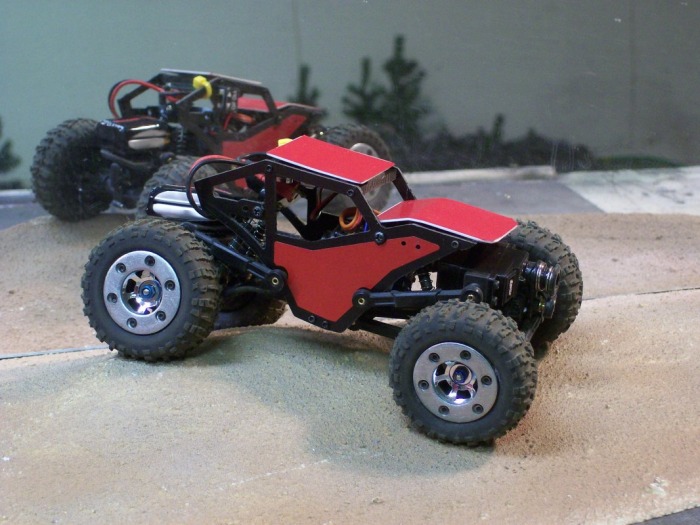
Ripper7's Raptor V8E Chassis for Losi Micro Rock Crawler
So it has become pretty obvious that the Losi Micro Crawler in it's stock form is rather limited in the performance area....
One way to increase performance is to change the chassis, this changes the link and shock angles, thus increasing performance through increased articulation and increased traction.
There are not many choices out there yet, but one is ready, the Micro Raptor Chassis V8E by Ripper 7 Racing.
I managed to get my hands on one of these kits and over the last two days have gone through it, installed it, and ran the heck out of it....are you ready for the verdict? If so then read on.......
....The Micro Raptor is a TVP (twin vertical plate) chassis with a twist, when assembled it is also a pretty cool looking faux tuber chassis.
The chassis comes as two machine cut Delrin chassis plates, two large cross beam/shock mounts, three smaller cross beams, and if selected a set of sheets that will form the hood and roof.
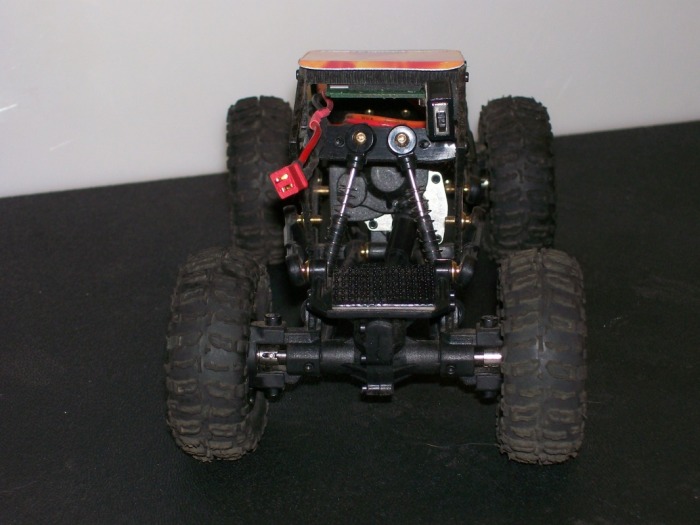
The chassis plates and shock mounts installed, installing these mounts is optional as the shocks can be mounted in the stock locations on the chassis plate if desired...or these shock mounts can be used to place the shocks in a more layed back position and moves the tops inward of the plates for improved shock angles leading to smoother articulation.
I elected to use the inboard mounts.
I also elected to run a semi-droop suspension (DT long springs on all four shocks), I then printed out some fire decals to place on the sides, hood, and roof (Solid color decal panels were included but I opted for a more "Custom" look.
Here the shocks are mounted layed back and inboard front and rear.
You'll see very quickly why I elected this position, it really changes the shock angles and articulation is much smoother
With the inboard shock position the suspension move much smoother as the shocks do not bind on the sides of the links, edges of the chassis, or on the front servo wires.
If you were to use the stock shocks in the stock locations there is enough room under the front hood to place a battery on top of the servo...however with the droop suspension and inboard shock locations I moved the battery back to the rear deck.
This chassis also clocks the transmission (changes the front to rear angle) so that the front drive shaft is slightly raised and Ripper recommends running this chassis with a motor forward configuration. I mounted mine up this way and it does slightly improve the angle on the front of the tranny...it is less likely to hang up there as it does with the stock chassis.
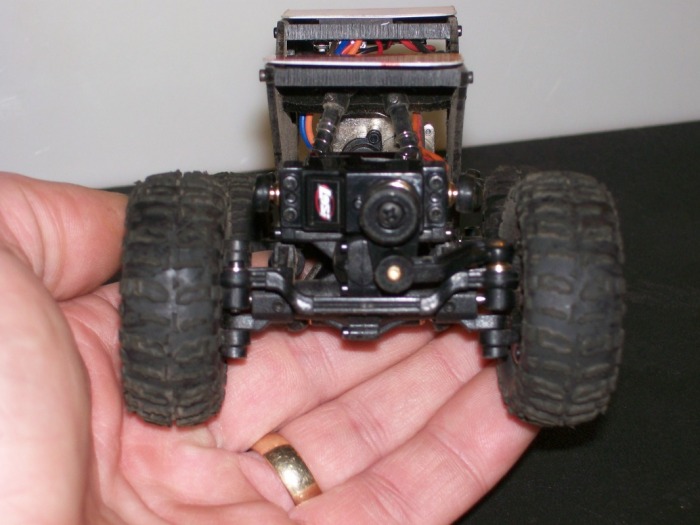
Using a custom chassis like this also adds one more little difference....there is no mount for the ESC on top of the tranny. This is easily remedied bu de-casing the ESC and running it either on the front servo, rear deck, or as Ripper (and I recommend, servo taped to the bottom of the roof. In this location it is out of sight and protected from roll overs.
So now lets move on to performance on the rocks....
I guess I can describe all the differences between this chassis and the stock chassis in one short simple word....WOW!
This design is far superior to stock. I found this truck climbing and side hilling spots that gave me fits with the stock truck. During our Crawl-In today I ran against other stock trucks...they all had several spots that were impassable. Then the Micro Raptor would leisurely walk through them like they weren't even there.....they were very impressed and so was I!
I have to say that for the price you will be very surprised at the quality and performance of the Micro Raptor Chassis kit.
Dog gives it a BIG TWO THUMBS UP!


BWD Wheel Weight System for Losi Micro Rock Crawler
One of the first modifications everyone wants to make to the new Losi Micro rock Crawler is to add weight to the wheels.
This helps keep the wheels planted to the surface, lowers the COG (Center Of Gravity), and heavier wheels give more traction.
There are two schools of thought when it comes to wheel weight.
* The first is to dismount the tires and add weight internally by twisting solder or lead strip to the inside of the wheel the putting the foam and tire back on over it. This works great and you can add a considerable amount of weight this way....but it is time consuming and very hard to change once it is done.
*The second way is to use plates bolted to the outside of the wheel in place of the plastic beadlock rings. Adding weight this way is fast and changable within minutes without dismounting the tire.
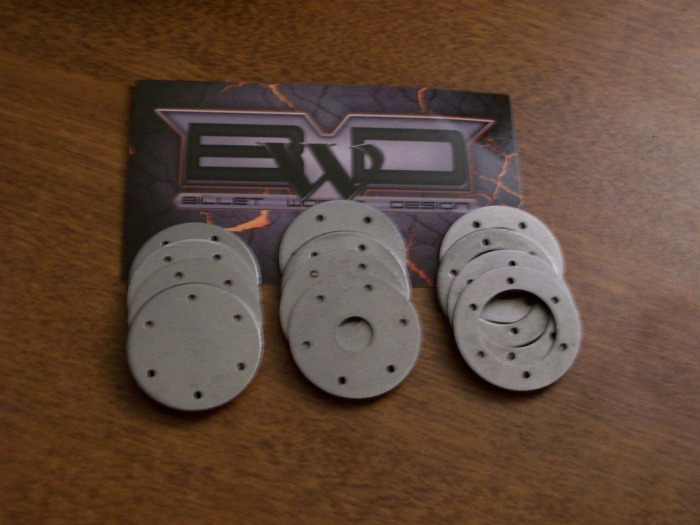
The Billet Works Design wheel weight system for the micro crawler is a plate system. The system comes in different configurations based on the users needs.
The BWD system weights comes in a natural steel finish, ready to polish or paint....or you can run them au-natural. The fit and finish on them are first class, no rough edges and the holes are spot on.
For this review I ordered up the basic system which includes 4 heavy, 4 medium, and 4 light discs as shown below
These plates will install in place of the plastic beadlock rings. Using one plate you can install using the stock screws in the wheels....however if you wish to stack the plates for extra weight then you should order up the extended hardware kit, this includes a set of extra long screws designed for stacking the plates.
In my installation I used one light plate (big hole) on the inside of each wheel using the stock screws. I then installed two stacked heavy plates (solid) to the outside of each front wheel and two stacked medium plates (small hole) to the outside of each rear wheel using the extended screws.
This combination yields a weight of 22g per rear wheel and 24g per front wheel, the stock wheel is 11g
So the weight increase is significant, and the weights look good too, they give the crawler a real Macho look. Now this truck is ready for business!
I tested these weights on two different courses.
*The first course was trap rock, jagged pieces ranging from 4 inches to 8 inches. The extra weight allowed the tires to grab the sharp edges much easier than the stock weight tires did. The truck also had more traction on the smooth sides as well allowing it to climb flat pieces at a steeper vertical angle than before.
The only down side I found was that in these sharp rocks the exposed screw heads would sometimes snag the edges of the rocks causing the wheel to jam. A simple twist of the steering was usually enough to clear the rock....but it did prevent a smooth even crawl that would have been possible with recessed screw heads.
*The second course was expanded foam, another popular Micro Crawler course surface. The results were the same, increased traction in all areas though the snagging problem was minimal on the foam.
Conclusions:
PROS
Priced at $10 a set these weights are a good deal.
They allow the user to adjust the amount of weight at each wheel without dismounting the tire or wheel (except to apply weights to the backside of the wheel).
The fit and finish on these are excellent.
They look great!
CONS
The plates are a bit on the thin side, personally I would have liked to have seen more weight included in the set, either in extra plates or in one thicker outer plate with recessed screw holes to prevent the snagging problem
Hot Racing Rear Axle Lock Outs for Losi Micro Rock Crawler
So what the heck are Lock Outs?
Lock Outs simply replace the rear C-Hub, Hub, Stub Axle, and Drive Axle with a one piece hub unit and one piece axle.
The stock system uses four pieces, the New HR Lock Outs use two pieces.....what are the benefits?
With the stock rear hubs it was possible to take a fall that would knock the hub out of alignment, basically the multiple plastic pieces would twist, not a big deal but it makes the truck track funny.
The HR units are aluminum and being one piece have nothing to knock out of alignment.
It's as simple as that!!!
Installing is very straight forward and can be completed within about 15 minutes.
Remove the stock hubs, stub axles, c-hubs, and drive axles. Pop out the bearings and place them in the new HR units, install the single piece drive shaft and bolt the unit in place.....done!
These units are a bit spendy, but they look cool and do exactly what they are designed to do....stiffen up the rear hubs.
Dog gives these a Thumbs Up Rating!

LiPo Battery to fit the Micro Crawler
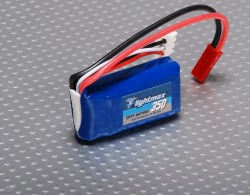
Want a great LiPo battery for these little Micro crawlers?
Try this 350mah 2S LiPo...and the price will make you smile too!
This battery must be mounted on the rear deck due to size.....but the power you get is amazing!!!
You will also have to change out the plug.
I have used these batteries since the Micro Crawler came out with great results....average run time is 25 minutes.
http://www.hobbyking.com/hobbyking/store/uh_viewItem.asp?idProduct=9028&Product_Name=ZIPPY_Flightmax_350mAh_2S_20C__&aff=111824
